38 KiB
Modding für Minecraft – der einfache Einstieg
Einführung
Minecraft ist ein 3D Spiel ohne festes Spielziel. Mit einfachen Blöcken kannst du ganze Welten bauen oder auf Entdeckungsreise durch eine immer weiter generierte Welt gehen. Minecraft kann mit Hilfe von 'Mods' (Kurzform für modifications) -- also mit weiterem Programmcode -- erweitert werden. ScriptCraft ist eine solche Modifikation, die es dir erlaubt, direkt im Spiel JavaScript zu benutzen. Damit sind folgende Dinge möglich:
- Mit simplen JavaScript Befehlen Blöcke bauen
- Das Spiel mit interessanten neuen Eigenschaften ausstatten (neue Items hinzufügen, das Spielverhalten beeinflussen und Mini-Games erstellen)
Du kannst Minecraft im Einspieler- und im Mehrspielermodus mit Freunden spielen. Die meisten spielen Minecraft im Multiplayermodus online über das Internet oder lokal.
Installation
CraftBukkit ist eine spezielle Server-Version von Minecraft, die es dir auf einfache Weise erlaubt, Modifikationen und Erweiterungen für Minecraft zu erstellen. ScriptCraft ist eine solche Modifikation, die CraftBukkit benutzt. Modifikationen für Minecraft zu erstellen ist schwer, ScriptCraft macht dies dir einfacher. Folgende Schritte sind zur Installation notwendig:
-
Die ScriptCraft Modifikation herunterladen. Danach in das Verzeichnis
craftbukkit/pluginskopieren, das im ersten Schritt erstellt wurde. -
Den CraftBukkit Server starten.
-
Operator-Berechtigung setzen. Dazu musst du im CraftBukkit Consolenfenster
op {username}eingaben und mit ENTER bestätigen ({username}natürlich mit dem eigenen Minecraft Spielernamen ersetzen). Dieser Befehl sorgt dafür, dass diesem Spieler Administratorrechte gegeben wird. Damit kannst du weitaus mehr Befehle auf dem Server ausführen als ein normaler Spieler. -
Um sicherzustellen, dass die Installation funktioniert hat und alles richtig eingerichtet ist, kannst du im CraftBukkit Consolenfenster
js 1+1eingegeben. Es sollte nun> 2erscheinen.
Gratulation! Jetzt ist alles bereit um mit dem Programmieren in ScriptCraft zu beginnen. Normalerweise werden Modifikationen in Java programmiert. Dies macht das Erstellen von eigenenen Modifikationen oder neuer Spiellogik schwer, da du zuerst Java lernen musst. Mit dem ScriptCraft Plugin ist es nicht mehr nötig Java programmieren, du kannst stattdessen JavaScript verwenden. JavaScript ist einfacher zu lernen als Java und ist zugleich flexibler. JavaScript kannst du auch für die Erstellung von dynamischen Webseiten oder gar Server-Anwendungen verwenden.
JavaScript lernen
Da du coole Sachen in Minecraft mit ScriptCraft machen willst, musst du nicht viel von JavaScript wissen. Es genügen schon ein paar Grundlagen, damit du mit der Programmierung beginnen kannst. Du musst dir deshalb keine Sorgen machen, dass du am Anfang noch nicht alles kennst, das kommt mit der Zeit automatisch. ScriptCraft bringt eine Menge Funktionen mit, um Formen und Objekte zu bauen. Je mehr man sich mit JavaScript auskennt, desto mehr kann man auch machen -- nicht nur einfache Formen und Gebäude, sondern auch neue Spielregeln, Items, Aktionen, sogar kleine Multiplayerspiele. Für JavaScript-Grundlagen empfehle ich dir das lustige JavaScript Tutorial, für den direkten Einstieg in ScriptCraft, einfach hier weiterlesen ...
Erste Schritte
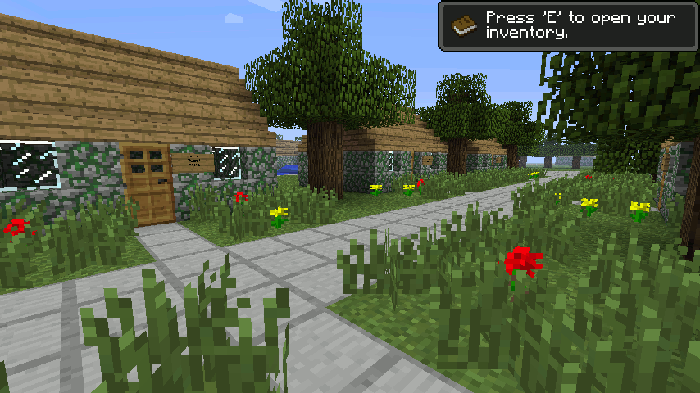
Keine Sorge, wenn du noch nie etwas mit JavaScript gemacht hast. Du wirst im Verlauf dieses Textes einiges über JavaScript und dem Programmieren im Allgemeinen lernen. Der Minecraft Server ist aufgesetzt, bereit zu verbinden ...
- Starte Minecraft (lasse das Bukkit Befehlsfenster offen)
- Klicke auf "Multiplayer" und dann auf "Add Server"
- Die Serveradresse ist "localhost". Dies ist ein spezieller Hostname, welcher auf den eigenen Computer verweist.
- Klicke auf "Join Server" um auf den Bukkit Server zu verbinden.
- Nach dem du dem Spiel beigetreten bist, kannst du mit der
/-Taste das Chatfenster öffnen. Eine Eingabezeile erscheint, in das du NAchrichten, aber auch Befehle eingeben kannst. Probierejs 1+1aus, die Nummer 2 sollte erscheinen.
Sehr gut! Du hast eben JavaScript Code eingegeben, welcher vom ScriptCraft Plugin interpretiert wurde und das Ergebnis direkt im Spiel angezeigt wurde.
Variablen
Mit einer Variable kannst du (der Programmierer) Dingen einen Namen geben. In
JavaScript werden Variablen mit dem var Schlüsselwort erstellt.
/js var position = "Saurons Festung"
Dies erstellt eine neue Variable mit dem Namen position, welche den Text
"Saurons Festung" enthält. Ab jetzt hat der Computer einen neuen Eintrag
im Speicher mit dem Namen position. Diesen Namen können wir so nutzen ...
/js echo(position)
... um folgendes anzuzeigen:
Saurons Festung
Du wunderst sich vermutlich, wo die "" abgeblieben sind. Um Text in einer
Variable zu speichern, muss dieser in " eingeschlossen werden. Der Computer
speichert die doppelten Anführungszeichen dabei aber nicht mit, nur den
eigentlichen Text. Variablen werden im Minecraft Server gespeichert, während
dieser läuft. Wiederhole den letzten Befehl den du eingegeben hast (drücke dazu
/ und danach Pfeil nach oben). Du kannst den Befehl so oft wiederholen
wie du willst, der Computer wird jedes Mal den selben Wert ausgeben. Du kannst
diesen Wert auch ändern:
/js position = "Das Auenland"
Beachte hierbei, dass das var Schlüsselwort fehlt, es wird nicht mehr
benötigt. Das var Schlüsselwort muss nur bei der Erstellung mit angegeben
werden. Jetzt führe folgenden Befehl aus:
/js echo(position)
... und es erscheint:
Das Auenland
Variablen können in JavaScript einfach angelegt und verändert werden. Neben
Variablen die du dir selbst anlegst gibt es auch Variablen, die ScriptCraft
für dich bereits angelegt hat. Eine solche Variable ist self. Diese
enthält Informationen über den aktuellen Spieler:
/js echo (self)
Folgendes erscheint:
CraftPlayer{name=fu86}
Natürlich ist der ausgegebene Name bei jedem Spieler ein anderer. Bei dir sollte dein Name erscheinen.
Funktionen
ScriptCraft bringt ein paar Funktionen mit, die im normalen JavaScript
nicht zu finden sind. Diese Funktionen helfen dir, neue Strukturen
und Gebäude zu erstellen, für die du normalerweise händisch Stunden
brauchen würdest. Bevor wir allerdings die Bau-Funktionen näher
betrachten, schauen wir uns die echo() Funktion an.
Die echo()-Funktion -- wie der Name schon vermuten lässt -- gibt alles zurück, was
du ihr als Parameter übergibst. Hier ein Beispiel:
/js echo("Hallo")
... und im Spiel wird folgendes erscheinen:
Hallo
... tippe ...
/js echo(5+7)
... und im Spiel wird folgendes angezeigt:
12
Damit kannst du sogar in Minecraft rechnen und deine Mathe-Hausaufgaben machen,
was aber nicht zu empfehlen ist. Hausaufgaben und Minecraft passen nicht sehr
gut zusammen! Die echo()-Funktion gibt alles aus, was sie als Parameter
bekommt; Text, Nummern und ganze Ausdrücke. Ein weiteres Beispiel:
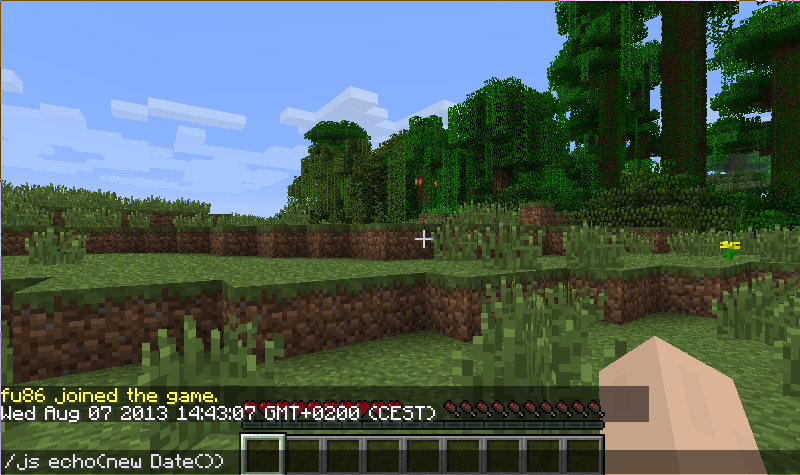
/js echo(new Date())
... gibt das aktuelle Datum aus. Wenn der Ausdruck oben für dich verwirrend
erscheint, mach dir keine Sorgen; new Date() erstellt ein neues
Date-Objekt, was das ist, wird später noch erklärt.
Tue Jan 08 2013 20:53:37 GMT-0000 (GMT)
echo() ist eine sehr nützliches Funktion, sie ist aber nicht Teil der
JavaScript Programmiersprache. Du kannst sie nicht ausserhalb von Minecraft
verwenden. Es gibt aber Funktionen, die in JavaScript enthalten sind, die auch
in ScriptCraft verwendet werden kann. Ein Beispiel:
/js Math.max(6, 11)
... gibt die größere der beiden Zahlen zurück (max ist das Kürzel für Maximum). Mit dieser Funktion ...
/js Math.min(6, 11)
... kann man dagegen die kleinere der beiden Zahlen zurückgeben. In JavaScript hat jeder Ausdruck einen Rückgabewert. Das unterscheidet JavaScript von Sprachen wie PHP oder C. Wenn das für dich im Moment keinen Sinn ergibt, ist das nicht schlimm, es wird rgend wann plötzlich Sinn ergeben. Das Ergebnis eines beliebigen Ausdrucks lässt sich in einer Variablen speichern. Etwa so:
/js var groesser = Math.max(6, 11)
Das Ergebnis steckt nun in der Variable groesser.
/js groesser
Dieses Mal haben wir nicht die echo()-Funktion verwendet, aber es wurde
trotzdem 11 zurückgegeben. ScriptCraft gibt immer den Rückgabewert auf
der Minecraft Console aus.
Du kannst allerdings auch eigene funktionen schreiben:
/js function aktuelle_uhrzeit() { return new Date() }
Hier hast du eben eine neue Funktion mit dem Name aktuelle_uhrzeit angelegt,
die jedes Mal ein neues Date-Objekt zurückgiebt, wenn sie aufgerufen wird. Du
hast vielleicht gemerkt, dass der Aufruf oben keinerlei Effekt hatte und nichts
passiert ist -- nicht mal die aktuelle Uhrzeit wurde ausgegeben. Das liegt daran,
dass der Inhalt der Funktion erst verarbeitet wird, wenn die Funktion aufgerufen
wird. Also rufen wir die Funktion auf:
/js aktuelle_uhrzeit()
... und die aktuelle Uhrzeit erscheint im Spiel. Gratulation, du hast soeben deine erste JavaScript-Funktion geschrieben. Du bist auf dem richtigen weg, ein Minecraft Modder zu werden :-)
Es gibt eine Menge fertiger Funktionen, die du nutzen kannst. Zum Beispiel folgende:
/js Math.random()
... diese gibt jedes Mal eine zufällige Nummer aus, wenn du sie aufrufst. Probier
es aus! Führe die Funktion ein paar mal aus (mit der Pfeil nach oben Taste geht
das schneller) und es wird jedes Mal eine neue Zufallszahl ausgegeben. Du kannst
dir Math.random() wie ein Würfel mit sehr vielen Seiten vorstellen. Jedes Mal
wenn du die Funktion aufrufst, wird erneut gewürfelt.
Dinge in Minecraft bauen
Jetzt kommen wir zum interessanten Teil -- Objekte und Gebäude in Minecraft
bauen. Von Hand bauen macht Spaß, doch wird anstrengend wenn man große und
aufwändige Dinge wie Türme, Burgen oder ganze Festungen bauen will. Hier kommt
ScriptCraft ins Spiel. ScriptCraft besitzt ein paar JavaScript-Funktionen, die
kombiniert viele interessante Dinge hervorbringen können. Fangen wir einfach an
um ein Gefühl dafür zu bekommen, wie ScriptCraft's Baufunktionen funktionieren.
Die Funktion, die du vermutlich am meisten verwenden wirst ist die
box()-Funktion. Wie der Name schon vermuten lässt, kann man damit Würfel und
Quader in jeder größe erstellen. Ein Würfel ist ein 3D-Objekt, bei dem alle
seiten gleich lang sind. Bei einem Quader können die Seiten unterschiedlich
lang sein.
Einen Würfel oder Quader kannst du in ScriptCraft mithilfe der Funktion box()
erstellen. Der Befehl benötigt nur die Angabe des Materials, das auf das Objekt
angewendet werden soll. Probier es einfach mal aus, zeige im Spiel mit dem
Fadenkreuz auf den Boden, gebe den folgenden Befehl ein und drücke die Enter-
Taste...
/js box("5")
... das wird den angepeilten Block zu einem Holz-Block umwandeln, denn die
Funktion box() hat anstelle des vorherigen Blocks einen neuen Block aus Holz
erstellt. Der Text "5" wird von Minecraft als "Holz" verstanden. Eine
Übersicht zu den möglichen Materialien und ihren zugehörigen Nummern findest
du auf dieser (englisch) Seite.
Typische Block Materialien
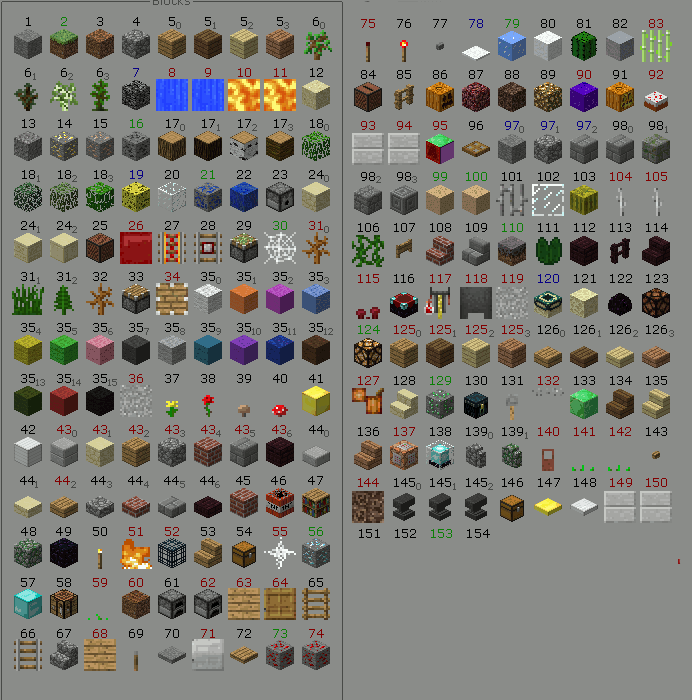
In Minecraft Programming, Materials aren't known by their name, instead numbers (sometimes 2 numbers) are used to indicate which material should be used. For example the number 2 is grass, 1 is cobblestone etc, while 5 is wood (oak). There are different types of wood so the text "5:1" means Spruce, "5:2" means Birch and "5:3" means Jungle wood. There are many different materials in the Minecraft world, the most commonly used materials for building are:
- "4" - Cobblestone
- "5" - Wooden Planks
- "5:2" - Birch wood Planks (light wood)
- "98" - Stone bricks
- "45" - Red bricks
- "68" - Doors
- "102" - Glass panes (for windows)
For reference, here is a chart of all of the blocks (not items) in the Minecraft world...
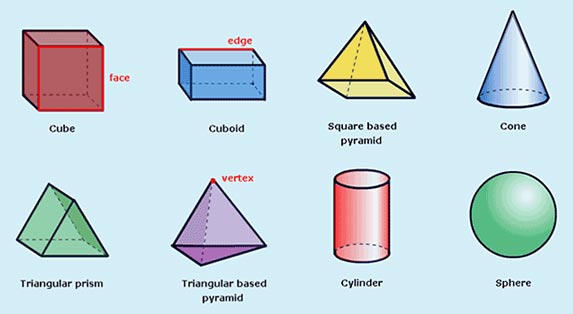
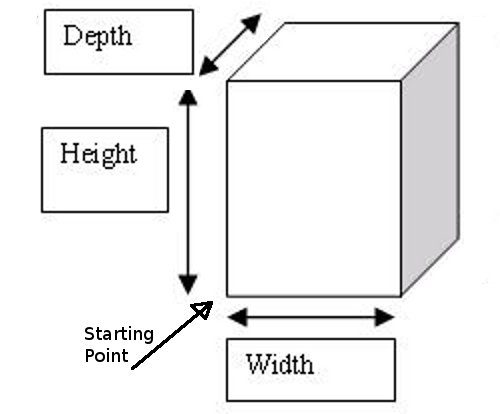
Dimensions
box() can do more than just
create single blocks - it can create cubes and cuboids of any
size. Take a look at the following picture which shows how shapes are
measured in 3D space. There are 3 dimensions (or sizes) to consider.
- Width
- Height
- Depth (or length) - not to be confused with how deep underground a mine-shaft can go. Think of Depth (or length if you prefer) as how far away you want something to extend.
Weitere Formen
box0( Block, Breite, Höhe, Tiefe )- erstellt eine leere Box, also innen hohl – perfekt für Häuser. Decke und Boden werden dabei genauso entfernt.cylinder( Block, Radius, Höhe )- erstellt Zylinder, z.B. sehr gut geeignet für Kaminecylinder0( Block, Radius, Höhe )- ergibt einen ausgehöhlten Zylinder ohne Decke und Boden – kann sehr gut für Türme verwendet werden.prism( Block, Breite, Tiefe )- erstellt dir eine dreieckige Form, die du z.B. für ein typisches Dach verwenden kannst.prism0( Block, Breite, Tiefe )- damit kannst du ein ausgehöhltes Dreieck erstellen.
The Drone Object
ScriptCraft is a Minecraft Mod that lets you execute Javascript code
in the game. It also lets you write your own Mod in Javacript. One
such mod that comes bundled with ScriptCraft is called the Drone
mod. The Drone is an (invsible) object you create every time you
execute any of the building or movement functions. When you execute...
/js box(5,3,2,4)
... a new Drone object is created and does the work of building on
your behalf. Think of a Drone as something like a remote control
plane that can move about freely and build things for you. Moving the
Drone is easy...
Movement
up( numberOfBlocks )- moves the Drone Up. For example:up()will move the Drone 1 block up. You can tell it how many blocks to move if you want it to move more than one block.down( numberOfBlocks )- moves the Drone Down.left( numberOfBlocks )- moves the Drone Left.right( numberOfBlocs )- moves the Drone Right.fwd( numberOfBlocs )- moves the Drone Forward (away from the player).back( numberOfBlocs )- moves the Drone Back (towards the player)turn( numberOfTurns )- Turns the Drone Clock-wise (right). For example:turn()will make the Drone turn right 90 degrees.turn(2)will make the Drone turn twice so that it is facing in the opposite direction.
Chaining - combining bulding and movement.
You can make a Drone move around before and after building by daisy-chaining the building and movement functions together. In the game, point at the ground then type the following...
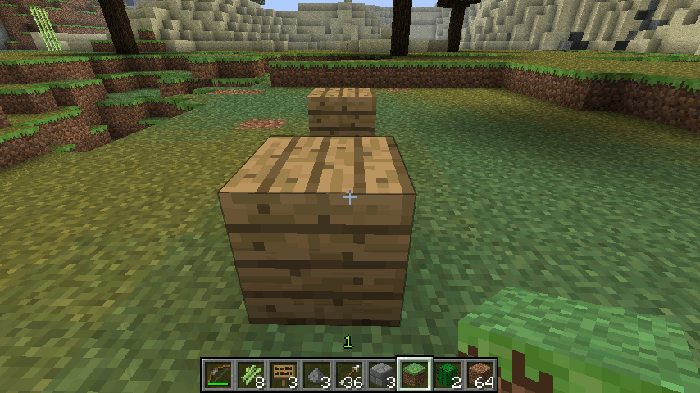
/js up(1).box(5).fwd(3).box(5)
A series of 2 boxes is created 3 blocks apart.
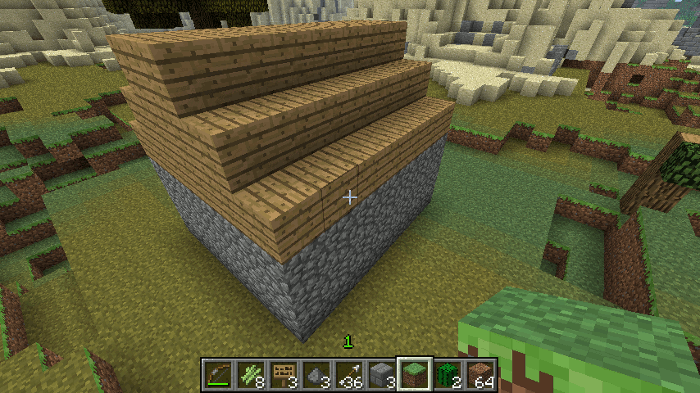
Excercise - Build a simple dwelling
OK. You know enough now about the Drone functions to be able to
build a simple dwelling. The dwelling should be a hollow building with
a sloped roof. Don't worry about doors or windows for now. The walls
should be made of Cobblestone ("4") and the roof made of wood ("5"). You can use
the following Drone functions to create a dwelling 7 blocks wide by
3 blocks high by 6 blocks long with a wooden sloped roof. It's up
to you to figure out how.
up()box0()prism0()
Your dwelling should end up looking something like this...
Remembering where you started.
Sometimes when you're building something big that requires lots of
manoeuvering by your Drone, you need to leave breadcrumbs as you go so
your Drone can return to where it started. Every new Drone has a
"start" checkpoint that it can return to by executing
move("start") ...
/js box("5").up(3).left(4).box("1").turn(3).fwd(5).right().box("1").move("start")
... A genius would have trouble figuring out how to get back
to where they started. Fortunately, they don't have to - the
move("start") function will take the Drone back to its starting
point.
-
chkpt( breadCrumb )- Leaves a mark at your Drone's current location so it can return there later. Think of it as giving a name to the place where your Drone is located.chkptis short for Check-Point - a place in a game where you usually save your progress. -
move( breadCrumb )- Moves your Drone to a location you named usingchkpt(). It brings your Drone back to the place where you saved it.
Both chkpt() and mark() are useful for when you want to build
complex things that require your Drone to move about a lot ( for
example, Castles, mansions, palaces, etc).
Saving your work
You can build cool things using the in-game command-prompt and the
/js command but sooner or later you'll probably want to build
something more complex and save your commands so you can run them
again when you quit the game and start it up again.
Notepad++ Is a special text editor (like Notepad which comes installed on every Windows machine) that is well suited for writing code. If you don't already have it on your machine, you can install Notepad++ here. I recommend using NotePad++ rather than plain old Notepad because it understands Javascript.
Your First Minecraft Mod!
So, You've learnt a little bit about Javascript and what the Drone() object can do, let's use that knowledge to create a Minecraft Mod!
Once you've installed Notepad++, Launch it, create a new file and type the following...
function greet(){
    echo("Hi " + self.name);
}
... then save the file in a new directory
craftbukkit/js-plugins/{your_name} (replace {your_name} with your
own name) and call the file greet.js (be sure to change the file-type
option to '. All Files' when saving or NotePad++ will add a '.txt'
extension to the filename. Now switch back to the Minecraft game and
type...
/reload
... to reload all of the server plugins. Your mod has just been loaded. Try it out by typing this command...
/js greet()
... it should display ...
Hi {your-username-here}
... where {your-username-here} will be replaced with your own minecraft username. Congratulations - You've just written your very first Minecraft Mod! With ScriptCraft installed, writing Minecraft Mods is as simple as writing a new javascript function and saving it in a file in the js-plugins directory. This function will now be avaible every time you launch minecraft.
Parameters
If you want to change the greet() function so that it displays a
greeting other than "Hi " you can change the code in the greet()
function, or better still, you can use Parameters. Parameters are
values you provide to a function so that the function behaves
differently each time it is called.
Change the greet() function so that it looks like this...
function greet( greeting ) {
    echo( greeting + self.name );
}
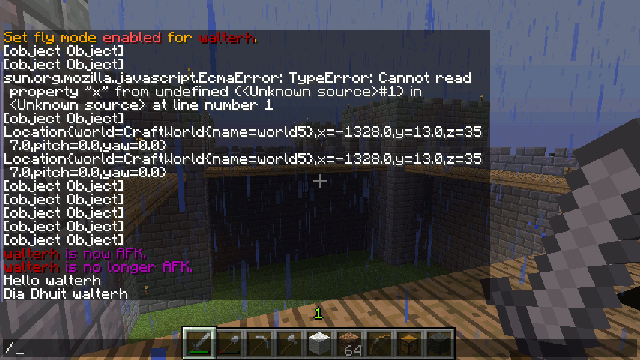
... Save your greet.js file and issue the /reload command in minecraft. Now enter the following command in Minecraft...
greet("Hello ");
... Now try ...
greet("Dia Dhuit ");
... you should see the following messages in your chat window...
Hello {your name}
Dia Dhuit {your name}
... Parameters let you provide different values to functions each time they're called. As you'll see later, Parameters are very useful when changing the behaviour of MineCraft.
true or false
Try entering each of the following statements and make a note of the answers given by minecraft...
/js 1 < 2

/js 1 > 2
... the answer given by the first statement ( 1 < 2 ) should be
true since 1 is less than 2. The < symbol - usually found near the
bottom right of your keyboard - means test to see if something is less
than another so 1 < 2 is a way of asking the computer "is 1 less
than 2 ?". This is a silly example of course since we know 1 is less
than 2 but when dealing with variables we might not know in advance
what its value is or whether it's greater than (bigger) or less than
(smaller) another number or value. The result of the 2nd statement (1 > 2)
should be false since 1 is not greater than 2. Now try this...
/js 1 = 2
... The result won't be what you expected. You'll see an Error message
-
that's OK. What's happened here is I've tried to test to see if 1 is equal to 2 but I've made one of the most common mistakes even experienced programmers make. If you want to test to see if two things are the same, you use
==that's two equals signs right next to each other. Let's try again.../js 1 == 2
... this time you should get an answer false since 1 obviously isn't
equal to 2. These are the different operators used when comparing
things...
<Is less than ?>Is greater than ?==Is equal to ?<=Is less than or equal to ?>=Is greather than or equal to ?!=Is not equal to ?
... try comparing some more numbers yourself - say for example, compare the ages of your friends or siblings to your own age.
More fun with true or false
You can find out if you can Fly in minecraft by typing the following statement...
/js self.allowFlight
... the result will be true or false depending on whether you can
fly or not. You can turn on and off your ability to fly by setting
your allowFlight property to true or false. Try it...
/js self.allowFlight = true
... Now you can fly! To turn off flight...
/js self.allowFlight = false
... and you come crashing down to earth. This is just one example of
how true and false are used throughout ScriptCraft - these are
called boolean values - named after George Boole, a 19th Century
Maths Professor at University College Cork. There are plenty more
examples of boolean values in Minecraft. You can find out if monsters
are allowed in your minecraft world by typing the following
statement...
/js self.location.world.allowMonsters
... The result of this statement will be either false (Phew!) or
true (Yikes!) depending on how your server has been
configured. However, typing the following statement doesn't work as
expected...
/js self.location.world.allowMonsters = true
... This statement won't work as expected - it will give an Error message. This is because sometimes we can read variables but we can't change them the same way we read them (this is because of how Javascript, Java and the CraftBukkit API work together). To turn on or off the spawning of monsters, type the following...
/js self.location.world.setSpawnFlags(false, true)
... the setSpawnFlags() method takes 2 parameters, the first
parameter says whether or not monsters can spawn, and the 2nd says
whether or not Animals can spawn. (SIDENOTE: You may be wondering how
to change other aspects of the Minecraft game - pretty much all
aspects of the game can be changed. Changes are made using what are
called API calls - these are calls to functions and methods in
Minecraft - you can read more about these on the CraftBukkit API
Reference.)
...and Again, and Again, and Again,...
One of the things Computers are really good at is repetition. Computers don't get tired or bored of doing the same thing over and over again. Loops are handy, if you want to run the same code over and over again, each time with a different value.
Counting to 100
At the in-game command prompt (hint: press 't') type the following then hit Enter...
/js for (var i = 1 ; i <= 100 ; i = i + 1) { echo( i ); }
... The above code will count from 1 to 100. The first thing you'll notice if you run the above code is how quickly the count happened. You're probably curious how long it would take to count to 1000. Try it out for yourself. Change the above line of code so that it counts to 1000 instead of 100. If you're feeling adventurous, see how long it takes to count to ten thousand, one hundred thousand or even one million.
The for statement is useful when you want to repeat something over and over. It has 4 parts...
- The initialiser:
var i = 1- this happens once at the start of the loop. - The test:
i <= 100- this happens at the start of each run around the loop. If the test fails, then the loop ends. - The increment:
i = i + 1- this happens at the end of each run around the loop. If you didn't have a statement here, the loop might never finish.i = i + 1is often written asi++- it's shorter and does basically the same thing. - The body - everything that appears between the
{and}(opening and closing curly braces).
for loops becomes very useful when you combine it with Arrays -
remember, an Array is just a list of things, for example - the players
connnected to a server, the worlds of a server and so on.
Saying "Hi!" to every player
At the in-game command prompt type the following then hit Enter...
/js for (var i = 0;i < server.onlinePlayers.length; i++){ server.onlinePlayers[i].sendMessage("Hi!"); }
... Lets look at these statements in more detail. We had to enter the statements on a single line at the in-game command prompt but the statements could be written like this...
var players = server.onlinePlayers;
for (var i = 0; i < players.length; i++) {
    var player = players[i];
    player.sendMessage("Hi!");
}
... On the first line, a new variable players is created from the
server object's onlinePlayers property. players is more concise and
easier to type than the long-winded server.onlinePlayers. On the
second line, the for loop is declared, a counter variable i is set
to 0 (zero - arrays in javascript start at 0 not 1) and each time
around the loop is tested to see if it's less than the number of
players online. At the end of each run around the loop the i
variable is incremented (increased by 1) so that the next player can
be messaged. Inside the body of the for loop (everything between the
opening { and closing } curly braces) the players[i] expression
refers to the player in the players array at position[i]. Imagine
there are 4 players online on a minecraft server, the players array
might look like this...
- players[0] = 'CrafterJohn'
- players[1] = 'MinerPaul'
- players[2] = 'ExplorerRingo'
- players[3] = 'TraderGeorge'
... in this case players.length will be 4 (since there are 4 online
players), the for-loop will go around 4 times starting from position 0
and going all the way up to position 3, sending a message to each of
the players in the array. It's time for a new scriptcraft
function. Open the hi.js file you created earlier (using NotePad++ ,
TextWrangler or your editor of choice) and add the following code at
the bottom of the file...
function hiAll(){
    var players = server.onlinePlayers;
    for (var i = 0; i < players.length; i++) {
        var player = players[i];
        player.sendMessage("Hi!");
    }
}
... save the file, at the in-game command prompt type reload and
then type /js hiAll(). This will send the message Hi! to all of
the players connected to your server. You've done this using a for
loop and arrays. Arrays and for loops are used heavily in all types
of software, in fact there probably isn't any software that doesn't
use for loops and Arrays to get things done.
While Loops
Another way to repeat things over and over is to use a while
loop. The following while loop counts to 100...
var i = 1;
while (i <= 100){
    echo( i );
    i = i + 1;
}
A while loop will repeat until its condition is false - the
condition in the above example is i <= 100 so while i is less than
or equal to 100 the code within the while block (everything between
the starting { and ending } curly braces) will run. It's important
that you change the variable being tested in a while loop, otherwise
the while loop will never it - it will run forever. Try running the
following code...
/js var i = 1; while (i <= 100){ echo( i ); }
The code above will contine printing out the number 1 until the end of
time (or until you unplug your computer). That's because the i
variable is never incremented (remember - incrementing just means
adding 1 to it) so i will always be 1 and never changes meaning the
loop goes on forever. Again - this is a mistake even experienced programmers sometimes make.
Just like for loops, while loops can be also be used to loop
through arrays. The following loop prints out all of the players on
the server...
var players = server.onlinePlayers;
var i = 0;
while ( i < players.length ) {
    echo( players[i] );
    i = i + 1;
}
... whether you chose to use a for loop or a while loop is largely
a matter of personal taste, for loops are more commonly used with
Arrays but as you see from the example above, while loops can also
loop over Arrays.
utils.foreach() - Yet another way to process Arrays
Both the for statement and while statement are standard commonly
used javascript statements used for looping. ScriptCraft also comes
with a special function for looping called utils.foreach().
utils.foreach() is a convenience function, you don't have to use it if
you prefer the syntax of javascript's for and while
loops. utils.foreach() takes two parameters...
- An array
- A function which will be called for each item in the array.
...that's right, you can pass functions as parameters in javascript!
Let's see it in action, the following code will echo() (print) the
name of each online player...
utils.foreach( server.onlinePlayers, echo );
... in the above example, the list of online players is processed one
at a time and each item (player) is passed to the echo
function. Note here that I used echo not echo(). The round braces
() are used to call the function. If I want to pass the function as a
parameter, I just use the function name without the round braces. The
above example uses a named function which already exists ( echo ),
you can also create new functions on-the-fly and pass them to the
utils.foreach() function...
/*
  give every player the ability to fly.
*/
utils.foreach( server.onlinePlayers,
               function (player) {
                   player.setAllowFlight(true);
               }
);
... Another example, this time each player will hear a Cat's Meow...
/*
  Play a Cat's Meow sound for each player.
*/
utils.foreach( server.onlinePlayers,
               function (player) {
                   player.playSound(player.location,
                                    org.bukkit.Sound.CAT_MEOW,
                                    1,
                                    1);

               }
);
Exercise
Try changing the above function so that different sounds are played instead of a Cat's Meow. You'll need to lookup the CraftBukkit API's Sound class to see all of the possible sounds that can be played.
Loops are a key part of programming in any language. Javascript
provides for and while statements for looping and many javascript
libraries also provide their own custom looping functions. You should
use what you feel most comfortable with.
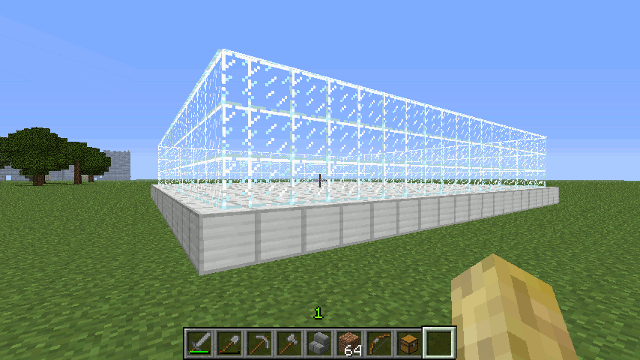
Putting for loops to use - Building a Skyscraper
For loops can be used to build enormous structures. In this next exercise I'm going to use a for loop to build a skyscraper. This skyscraper will be made of Glass and Steel (just like most skyscrapers in real-life). The first thing to do is see what a single floor of the skyscraper will look like. Place a block (of any type) where you want to eventually build the skyscraper, then while your cursor is pointing at the block, type the following into the in-game prompt...
/js var drone = box(blocks.iron,20,1,20).up().box0(blocks.glass_pane,20,3,20).up(3)
... you should a large (20x20) iron floor with 3 block high glass all around.
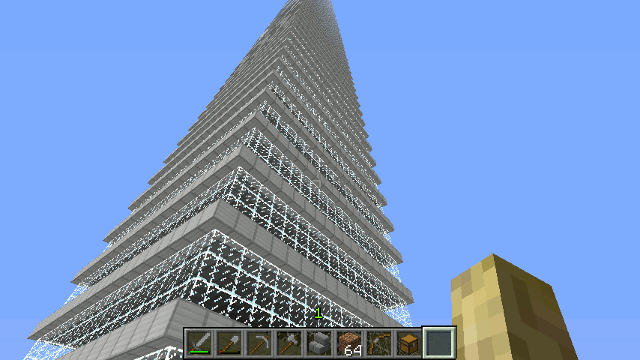
... A skyscraper with just a single floor isn't much of a skyscraper
so the next step is to repeat this over and over. This is where for
loops come in. Open your favorite text editor and create a new file in
your js-plugins/{your-name} directory called myskyscraper.js, then
type the following...
function skyscraper(floors)
{
    floors = floors || 10; // default number of floors is 10
    this.chkpt('skyscraper'); // saves the drone position so it can return there later
    for (var i = 0; i < floors; i++)
    {
        this.box(blocks.iron,20,1,20).up().box0(blocks.glass_pane,20,3,20).up(3);
    }
    return this.move('skyscraper'); // return to where we started
};

load("../drone/drone.js");
Drone.extend('skyscraper',skyscraper);
... so this takes a little explaining. First I create a new function
called skyscraper that will take a single parameter floors so that
when you eventually call the skyscraper() function you can tell it
how many floors you want built. The first statement in the function
floors = floors || 10; just sets floors to 10 if no parameter is
supplied. The next statement this.chkpt('myskyscraper') just saves
the position of the Drone so it can eventually return to where it
started when finished building (I don't want the drone stranded atop
the skyscraper when it's finished). Then comes the for loop. I loop
from 0 to floors and each time through the loop I build a single
floor. When the loop is done I return the drone to where it started.
The last 2 lines load the drone module (it must be loaded before I can
add new features to it) and the last line extends the 'Drone' object
so that now it can build skyscrapers among other things. Once you've
typed in the above code and saved the file, type reload in your
in-game prompt, then type ...
/js skyscraper(2);
... A two-story skyscraper should appear. If you're feeling adventurous, try a 10 story skyscraper! Or a 20 story skyscraper! Minecraft has a height limit (256 blocks from bedrock) beyond which you can't build. If you try to build higher than this then building will stop at that height.
I'll leave it as an exercise to the reader to create a city block of skyscrapers, 5 blocks apart using a for loop. Once you've figured that out, creating an entire city of blocks of skyscrapers is the next logical step. Of course, Minecraft doesn't have the same constraints as real-world densely populated areas so let your imagination go wild.
Making Decisions
All the programs we have seen so far have been fairly predictable - they went
straight through the statements, and then went back to the beginning again. This is
not very useful. In practice the computer would be expected to make decisions and
act accordingly. The javascript statement used for making decisions is if.
While standing on the ground in-game, type the following at the command prompt...
/js if ( self.flying ) { echo("Hey, You are flying!"); }
... No message should appear on screen. That is - Hey, You are flying! should not appear on screen. Now double-tap the space
bar to start flying in-game (tap the space bar twice in rapid
succession), then press and hold space to rise above the ground. Now
enter the same statement again (If you don't want to type the same
statement again, just press / then press the UP cursor key on your
keyboard, the statement you entered previously should reappear.
/js if ( self.flying ) { echo("Hey, You are flying!"); }
... this time the following message should have appeared on your screen...
Hey, You are flying!
The if statement tests to see if something is true or false and
if true then the block of code between the curly braces ( { and
} ) is executed - but only if the condition is true. The condition
in the above example is self.flying which will be true if you are
currently flying or false if you aren't.
What if you wanted to display a message only if a condition is not true ? For example to only display a message if the player is not flying...
/js if ( ! self.flying ) { echo ("You are not flying."); }
... This code differs in that now there's a ! (the exclamation mark)
before self.flying. The ! symbol negates (returns the opposite of)
whatever follows it.
What if you want to display a message in both cases - whether you're
flying or not? This is where the if - else construct comes in handy.
Open your favorite editor and type the following code into a new file
in your js-plugins directory...
 function flightStatus()
 {
     if ( self.flying )
     {
         echo( "Hey, You are flying!" );
     }
     else
     {
         echo( "You are not flying." );
     }
 }
... now type /reload at the in-game prompt then type /js flightStatus() and an appropriate message will appear based on
whether or not you're currently flying. Type the /js flightStatus()
command while on the ground and while flying. The message displayed in
each case should be different.
Next Steps
This guide is meant as a gentle introduction to programming and
modding Minecraft using the Javascript Programming Language.
Javascript is a very powerful and widely-used programming language and
there are many more aspects and features of the language which are not
covered here. If you want to dive deeper into programming and modding
minecraft, I recommend reading the accompanying ScriptCraft API
reference which covers all of the ScriptCraft functions, objects
and methods. I also recommend reading the source code to some of the
existing scriptcraft add-ons, the chat module (
js-plugins/chat/chat.js ) is a good place to start, followed by
Anatomy of a ScriptCraft Plug-in. The online Craftbukkit API
Reference provides lots of valuable information about the
different objects and methods available for use by ScriptCraft.
Categories
Minecraft, Programming, ScriptCraft