43 KiB
ScriptCraft API Reference
Walter Higgins
Module Loading
At server startup the ScriptCraft Java plugin is loaded and once loaded the Java plugin will in turn begin loading all of the javascript (.js) files it finds in the js-plugins directory (in the current working directory). If this is the first time the ScriptCraft plugin is loaded, then the js-plugins directory will not yet exist, it will be created and all of the bundled javascript files will be unzipped into it from a bundled resource within the Java plugin. The very first javascript file to load will always be js-plugins/core/_scriptcraft.js. Then all other javascript files are loaded.
Directory structure
The js-plugins directory is loosely organised into subdirectories - one for each module. Each subdirectory in turn can contain one or more javascript files. Within each directory, a javascript file with the same filename as the directory will always be loaded before all other files in the same directory. So for example, drone/drone.js will always load before any other files in the drone/ directory. Similarly utils/utils.js will always load before any other files in the utils/ directory.
Directories
As of February 10 2013, the js-plugins directory has the following sub-directories...
- core - Contains javascript files containing Core functionality crucial to ScriptCraft and modules which use it.
- drone - Contains the drone module and drone extensions. Drone was the first scriptcraft module.
- ext - Contains external 3rd party javascript libraries (e.g. json2.js - the JSON lib)
- mini-games - Contains mini-games
- arrows - The arrows module
- signs - The signs module
- chat - The chat plugin/module
- alias - The alias plugin/module
Core Module
This module defines commonly used functions by all plugins...
-
load (filename,warnOnFileNotFound) - loads and evaluates a javascript file, returning the evaluated object.
-
save (object, filename) - saves an object to a file.
-
plugin (name, interface, isPersistent) - defines a new plugin. If isPersistent is true then the plugin doesn't have to worry about loading and saving state - that will be done by the framework. Just make sure that anything you want to save (and restore) is in the 'store' property - this will be created automatically if not already defined. (its type is object {} )
-
ready (function) - specifies code to be executed only when all the plugins have loaded.
-
command (name, function) - defines a command that can be used by non-operators.
load() function
The load() function is used by ScriptCraft at startup to load all of
the javascript modules and data. You normally wouldn't need to call
this function directly. If you put a javascript file anywhere in the
craftbukkit/js-plugins directory tree it will be loaded automatically
when craftbukkit starts up. The exception is files whose name begins
with an underscore _ character. These files will not be
automatically loaded at startup as they are assumed to be files
managed / loaded by plugins.
Parameters
- filenames - An array of file names or a single file name.
- warnOnFileNotFound (optional - default: false) - warn if the file was not found.
Return
load() will return the result of the last statement evaluated in the file.
Example
load(__folder + "myFile.js"); // loads a javascript file and evaluates it.

var myData = load("myData.json"); // loads a javascript file and evaluates it - eval'd contents are returned.
myData.json contents...
__data = {players:{
                   walterh:{
                            h: ["jsp home {1}"],
                            sunny:["time set 0",
                                   "weather clear"]
                           }
                  }
         }
save() function
The save() function saves an in-memory javascript object to a
specified file. Under the hood, save() uses JSON (specifically
json2.js) to save the object. Again, there will usually be no need to
call this function directly as all javascript plugins' state are saved
automatically if they are declared using the plugin() function. Any
in-memory object saved using the save() function can later be
restored using the load() function.
Parameters
- objectToSave : The object you want to save.
- filename : The name of the file you want to save it to.
Example
var myObject = { name: 'John Doe',
                 aliases: ['John Ray', 'John Mee'],
                 date_of_birth: '1982/01/31' };
save(myObject, 'johndoe.json');
johndoe.json contents...
var __data = { "name": "John Doe",
               "aliases": ["John Ray", "John Mee"],
               "date_of_birth": "1982/01/31" };
plugin() function
The plugin() function should be used to declare a javascript module
whose state you want to have managed by ScriptCraft - that is - a
Module whose state will be loaded at start up and saved at shut down.
A plugin is just a regular javascript object whose state is managed by
ScriptCraft. The only member of the plugin which whose persistence is
managed by Scriptcraft is state - this special member will be
automatically saved at shutdown and loaded at startup by
ScriptCraft. This makes it easier to write plugins which need to
persist data.
Parameters
- pluginName (String) : The name of the plugin - this becomes a global variable.
- pluginDefinition (Object) : The various functions and members of the plugin object.
- isPersistent (boolean - optional) : Specifies whether or not the plugin/object state should be loaded and saved by ScriptCraft.
Example
See chat/color.js for an example of a simple plugin - one which lets players choose a default chat color. See also Anatomy of a ScriptCraft Plugin.
command() function
The command() function is used to expose javascript functions for
use by non-operators (regular players). Only operators should be
allowed use raw javascript using the /js command because it is too
powerful for use by regular players and can be easily abused. However,
the /jsp command lets you (the operator / server administrator /
plugin author) safely expose javascript functions for use by players.
Parameters
- commandName : The name to give your command - the command will be invoked like this by players
/jsp commandName - commandFunction: The javascript function which will be invoked when the command is invoked by a player.
- options (Array - optional) : An array of command options/parameters
which the player can supply (It's useful to supply an array so that
Tab-Completion works for the
/jspcommands. - intercepts (boolean - optional) : Indicates whether this command
can intercept Tab-Completion of the
/jspcommand - advanced usage - see alias/alias.js for example.
Example
See chat/colors.js or alias/alias.js or homes/homes.js for examples of how to use the command() function.
ready() function
The ready() function provides a way for plugins to do additional
setup once all of the other plugins/modules have loaded. For example,
event listener registration can only be done after the
events/events.js module has loaded. A plugin author could load the
file explicilty like this...
load(__folder + "../events/events.js");

// event listener registration goes here
... or better still, just do event regristration using the ready()
handler knowing that by the time the ready() callback is invoked,
all of the scriptcraft modules have been loaded...
ready(function(){
    // event listener registration goes here
    // code that depends on other plugins/modules also goes here
});
The execution of the function object passed to the ready() function
is deferred until all of the plugins/modules have loaded. That way
you are guaranteed that when the function is invoked, all of the
plugins/modules have been loaded and evaluated and are ready to use.
Core Module - Special Variables
There are a couple of special javascript variables available in ScriptCraft...
- __folder - The current working directory - this variable is only to be used within the main body of a .js file.
- __plugin - The ScriptCraft JavaPlugin object.
- server - The Minecraft Server object.
- self - the current player. (Note - this value should not be used in multi-threaded scripts - it's not thread-safe)
refresh() function
The refresh() function will ...
- Disable the ScriptCraft plugin.
- Unload all event listeners associated with the ScriptCraft plugin.
- Enable the ScriptCraft plugin.
... refresh() can be used during development to reload only scriptcraft javascript files. See issue #69 for more information.
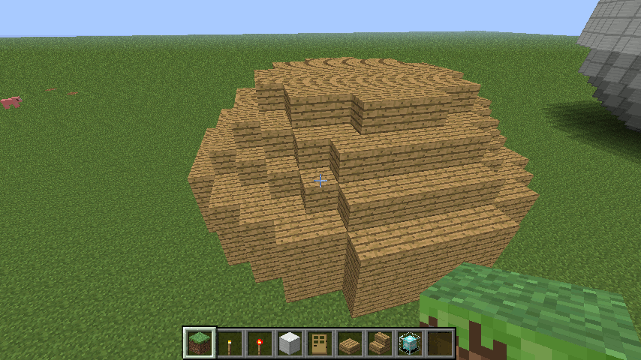
Drone.spiral_stairs() method
Constructs a spiral staircase with slabs at each corner.
Parameters
- stairBlock - The block to use for stairs, should be one of the following...
- 'oak'
- 'spruce'
- 'birch'
- 'jungle'
- 'cobblestone'
- 'brick'
- 'stone'
- 'nether'
- 'sandstone'
- 'quartz'
- flights - The number of flights of stairs to build.
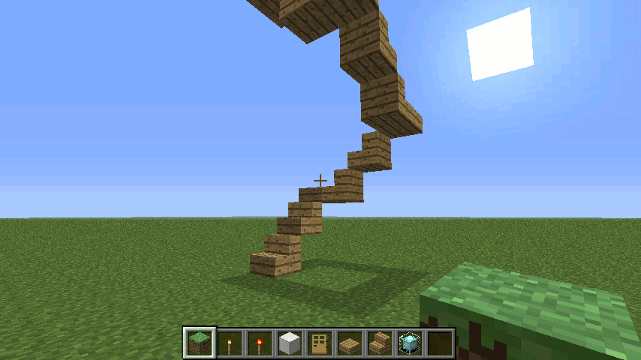
Example
To construct a spiral staircase 5 floors high made of oak...
spiral_stairs('oak', 5);
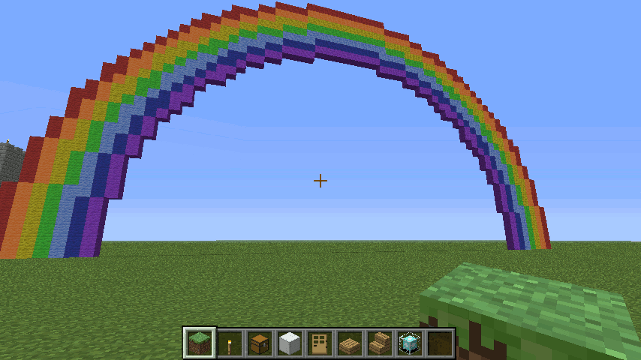
Drone.rainbow() method
Creates a Rainbow.
Parameters
- radius (optional - default:18) - The radius of the rainbow
Example
var d = new Drone();
d.rainbow(30);
Drone Module
The Drone is a convenience class for building. It can be used for...
- Building
- Copying and Pasting
It uses a fluent interface which means all of the Drone's methods return this and can
be chained together like so...
var theDrone = new Drone();
theDrone.up().left().box(blocks.oak).down().fwd(3).cylinder0(blocks.lava,8);
TLDNR; (Just read this if you're impatient)
At the in-game command prompt type...
/js box(blocks.oak)
... creates a single wooden block at the cross-hairs or player location
/js box(5).right(2).box('35:15',4,9,1)
... creates a single wooden block and a 2001 black obelisk that is 4 wide x 9 tall x 1 long in size. If you want to see what else ScriptCraft's Drone can do, read on...
Constructing a Drone Object
Drones can be created in 3 ways...
-
Calling any one of the methods listed below will return a Drone object. For example...
var d = box(blocks.oak)
... creates a 1x1x1 wooden block at the cross-hairs or player's location and returns a Drone object. This might look odd (if you're familiar with Java's Object-dot-method syntax) but all of the Drone class's methods are also global functions that return new Drone objects. This is short-hand for creating drones and is useful for playing around with Drones at the in-game command prompt. It's shorter than typing ...
var d = new Drone().box(5)
... All of the Drone's methods return this (self) so you can chain operations together like this...
var d = box(5).up().box(5,3,1,3).down().fwd(2).box(5).turn().fwd(2).box(5).turn().fwd(2).box(5)
-
Using the following form...
d = new Drone()...will create a new Drone. If the cross-hairs are pointing at a block at the time then, that block's location becomes the drone's starting point. If the cross-hairs are not pointing at a block, then the drone's starting location will be 2 blocks directly in front of the player. TIP: Building always happens right and front of the drone's position...
Plan View:
^
|
|
D---->
For convenience you can use a corner stone to begin building. The corner stone should be located just above ground level. If the cross-hair is point at or into ground level when you create a new Drone(), then building begins at that point. You can get around this by pointing at a 'corner stone' just above ground level or alternatively use the following statement...
d = new Drone().up()... which will move the drone up one block as soon as it's created.
-
Or by using the following form...
d = new Drone(x,y,z,direction)This will create a new Drone at the location you specified using x, y, z In minecraft, the X axis runs west to east and the Z axis runs north to south. The direction parameter says what direction you want the drone to face: 0 = east, 1 = south, 2 = west, 3 = north. If the direction parameter is omitted, the player's direction is used instead.
Parameters
- x (optional) : The x coordinate of the Drone
- y (optional) : The y coordinate of the Drone
- z (optional) : The z coordinate of the Drone
- direction (optional) : The direction in which the Drone is facing. Possible values are 0 (east), 1 (south), 2 (west) or 3 (north)
- world (optional) : The world in which the drone is created.
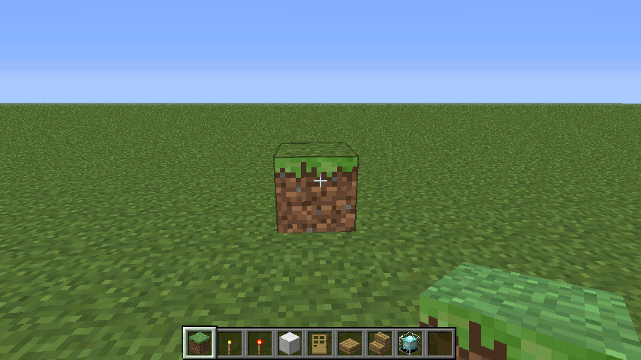
Drone.box() method
the box() method is a convenience method for building things. (For the more performance-oriented method - see cuboid)
parameters
- b - the block id - e.g. 6 for an oak sapling or '6:2' for a birch sapling.
Alternatively you can use any one of the
blocksvalues e.g.blocks.sapling.birch - w (optional - default 1) - the width of the structure
- h (optional - default 1) - the height of the structure
- d (optional - default 1) - the depth of the structure - NB this is not how deep underground the structure lies - this is how far away (depth of field) from the drone the structure will extend.
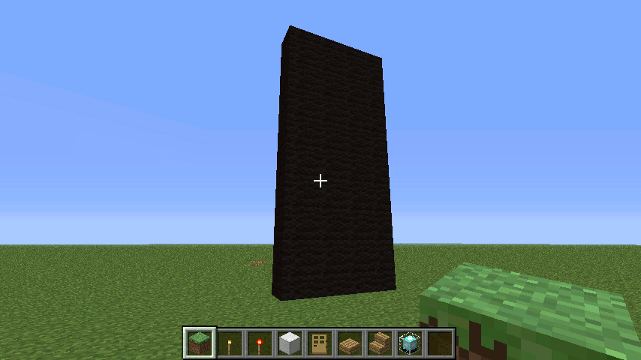
Example
To create a black structure 4 blocks wide, 9 blocks tall and 1 block long...
box(blocks.black, 4, 9, 1);
... or the following code does the same but creates a variable that can be used for further methods...
var drone = new Drone();
drone.box(blocks.black, 4, 9, 1);
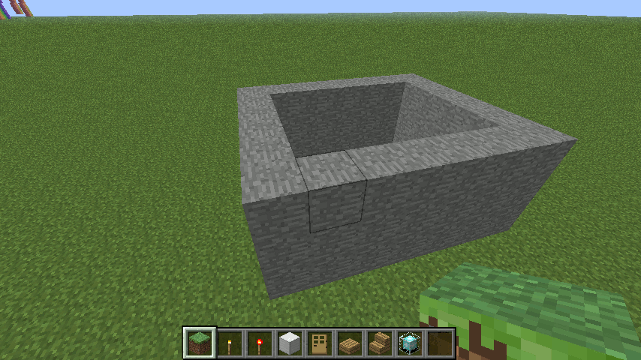
Drone.box0() method
Another convenience method - this one creates 4 walls with no floor or ceiling.
Parameters
- block - the block id - e.g. 6 for an oak sapling or '6:2' for a birch sapling.
Alternatively you can use any one of the
blocksvalues e.g.blocks.sapling.birch - width (optional - default 1) - the width of the structure
- height (optional - default 1) - the height of the structure
- length (optional - default 1) - the length of the structure - how far away (depth of field) from the drone the structure will extend.
Example
To create a stone building with the insided hollowed out 7 wide by 3 tall by 6 long...
box0( blocks.stone, 7, 3, 6);
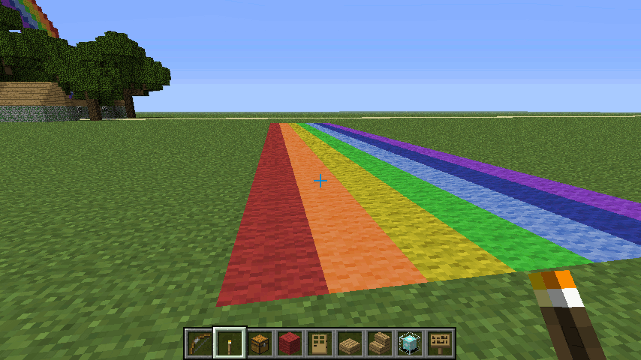
Drone.boxa() method
Construct a cuboid using an array of blocks. As the drone moves first along the width axis, then the height (y axis) then the length, each block is picked from the array and placed.
Parameters
- blocks - An array of blocks - each block in the array will be placed in turn.
- width
- height
- length
Example
Construct a rainbow-colored road 100 blocks long...
var rainbowColors = [blocks.red, blocks.orange, blocks.yellow, blocks.lime,
                     blocks.lightblue, blocks.blue, blocks.purple];

boxa(rainbowColors,7,1,30);
Drone Movement
Drones can move freely in minecraft's 3-D world. You control the Drone's movement using any of the following methods..
- up()
- down()
- left()
- right()
- fwd()
- back()
- turn()
... Each of these methods takes a single optional parameter
numBlocks - the number of blocks to move in the given direction. If
no parameter is given, the default is 1.
to change direction use the turn() method which also takes a single
optional parameter (numTurns) - the number of 90 degree turns to make.
Turns are always clock-wise. If the drone is facing north, then
drone.turn() will make the turn face east. If the drone is facing east
then drone.turn(2) will make the drone turn twice so that it is facing
west.
Drone Positional Info
- getLocation() - Returns a Bukkit Location object for the drone
Drone Markers
Markers are useful when your Drone has to do a lot of work. You can set a check-point and return to the check-point using the move() method. If your drone is about to undertake a lot of work - e.g. building a road, skyscraper or forest you should set a check-point before doing so if you want your drone to return to its current location.
A 'start' checkpoint is automatically created when the Drone is first created.
Markers are created and returned to using the followng two methods...
- chkpt - Saves the drone's current location so it can be returned to later.
- move - moves the drone to a saved location. Alternatively you can provide an org.bukkit.Location object or x,y,z and direction parameters.
Parameters
- name - the name of the checkpoint to save or return to.
Example
drone.chkpt('town-square');
//
// the drone can now go off on a long excursion
//
for (i = 0; i< 100; i++){
    drone.fwd(12).box(6);
}
//
// return to the point before the excursion
//
drone.move('town-square');
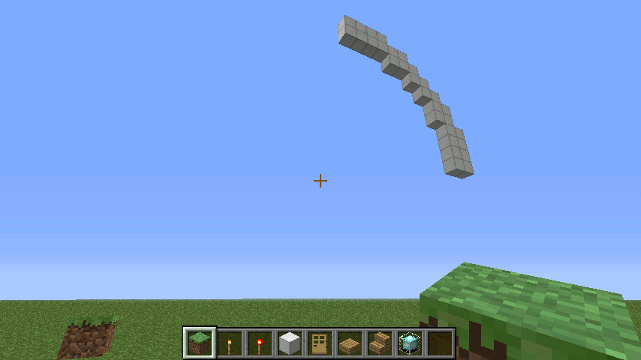
Drone.prism() method
Creates a prism. This is useful for roofs on houses.
Parameters
- block - the block id - e.g. 6 for an oak sapling or '6:2' for a birch sapling.
Alternatively you can use any one of the
blocksvalues e.g.blocks.sapling.birch - width - the width of the prism
- length - the length of the prism (will be 2 time its height)
Example
prism(blocks.oak,3,12);
Drone.prism0() method
A variation on prism which hollows out the inside of the prism. It uses the same parameters as prism.
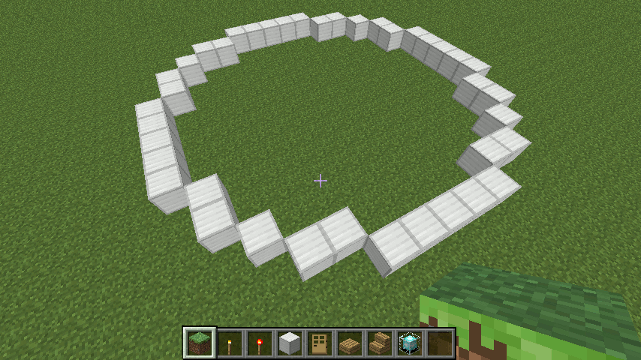
Drone.cylinder() method
A convenience method for building cylinders. Building begins radius blocks to the right and forward.
Parameters
- block - the block id - e.g. 6 for an oak sapling or '6:2' for a birch sapling.
Alternatively you can use any one of the
blocksvalues e.g.blocks.sapling.birch - radius
- height
Example
To create a cylinder of Iron 7 blocks in radius and 1 block high...
cylinder(blocks.iron, 7 , 1);

Drone.cylinder0() method
A version of cylinder that hollows out the middle.
Example
To create a hollow cylinder of Iron 7 blocks in radius and 1 block high...
cylinder0(blocks.iron, 7, 1);
Drone.arc() method
The arc() method can be used to create 1 or more 90 degree arcs in the horizontal or vertical planes. This method is called by cylinder() and cylinder0() and the sphere() and sphere0() methods.
Parameters
arc() takes a single parameter - an object with the following named properties...
- radius - The radius of the arc.
- blockType - The type of block to use - this is the block Id only (no meta). See Data Values.
- meta - The metadata value. See Data Values.
- orientation (default: 'horizontal') - the orientation of the arc - can be 'vertical' or 'horizontal'.
- stack (default: 1) - the height or length of the arc (depending on the orientation - if orientation is horizontal then this parameter refers to the height, if vertical then it refers to the length).
- strokeWidth (default: 1) - the width of the stroke (how many blocks) - if drawing nested arcs it's usually a good idea to set strokeWidth to at least 2 so that there are no gaps between each arc. The arc method uses a bresenham algorithm to plot points along the circumference.
- fill - If true (or present) then the arc will be filled in.
- quadrants (default:
{topleft:true,topright:true,bottomleft:true,bottomright:true}- An object with 4 properties indicating which of the 4 quadrants of a circle to draw. If the quadrants property is absent then all 4 quadrants are drawn.
Examples
To draw a 1/4 circle (top right quadrant only) with a radius of 10 and stroke width of 2 blocks ...
arc({blockType: blocks.iron,
     meta: 0,
     radius: 10,
     strokeWidth: 2,
     quadrants: { topright: true },
     orientation: 'vertical',
     stack: 1,
     fill: false
     });
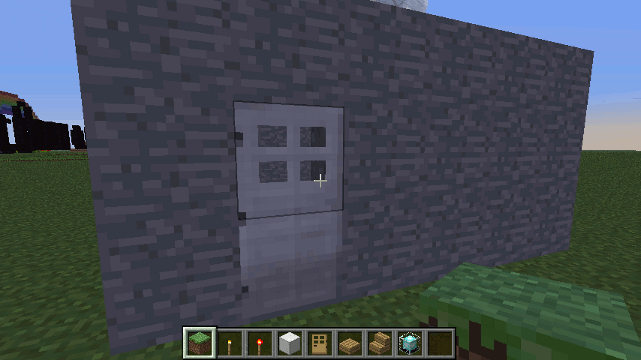
Drone.door() method
create a door - if a parameter is supplied an Iron door is created otherwise a wooden door is created.
Parameters
- doorType (optional - default wood) - If a parameter is provided then the door is Iron.
Example
To create a wooden door at the crosshairs/drone's location...
var drone = new Drone();
drone.door();
To create an iron door...
drone.door( blocks.door_iron );
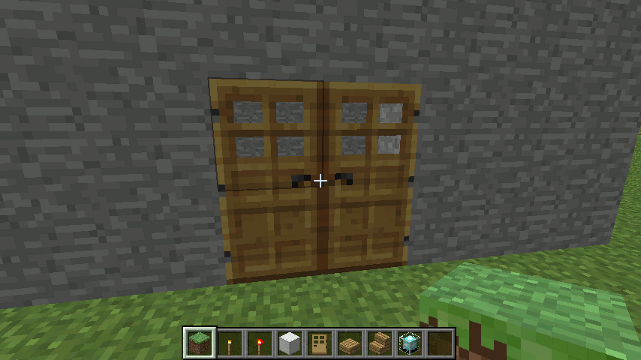
Drone.door2() method
Create double doors (left and right side)
Parameters
- doorType (optional - default wood) - If a parameter is provided then the door is Iron.
Example
To create double-doors at the cross-hairs/drone's location...
drone.door2();
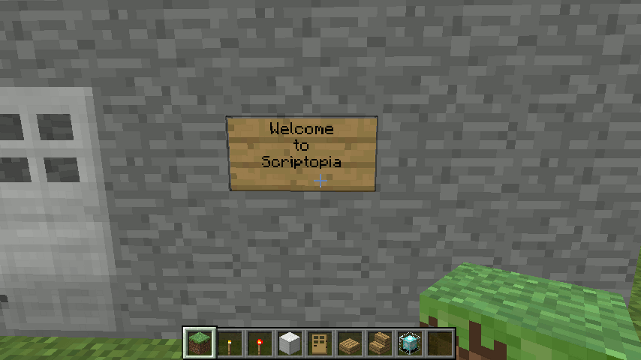
Drone.sign() method
Signs must use block 63 (stand-alone signs) or 68 (signs on walls)
Parameters
- message - can be a string or an array of strings.
- block - can be 63 or 68
Example
To create a free-standing sign...
drone.sign(["Hello","World"],63);
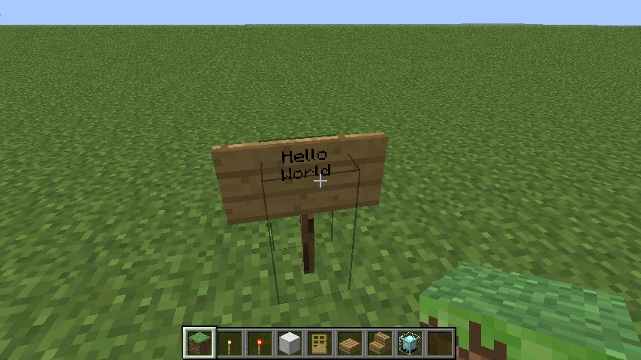
... to create a wall mounted sign...
drone.sign(["Welcome","to","Scriptopia"], 68);
Drone Trees methods
- oak()
- spruce()
- birch()
- jungle()
Example
To create 4 trees in a row, point the cross-hairs at the ground then type /js and ...
up().oak().right(8).spruce().right(8).birch().right(8).jungle();
Trees won't always generate unless the conditions are right. You
should use the tree methods when the drone is directly above the
ground. Trees will usually grow if the drone's current location is
occupied by Air and is directly above an area of grass (That is why
the up() method is called first).
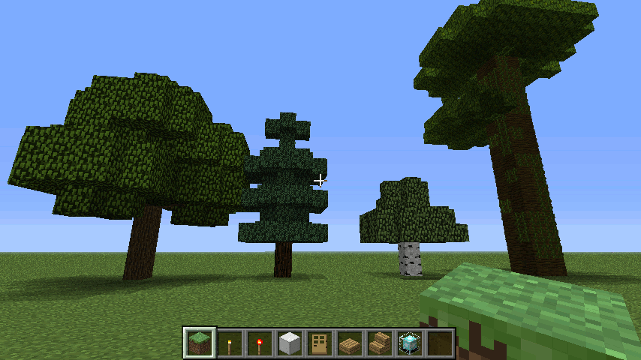
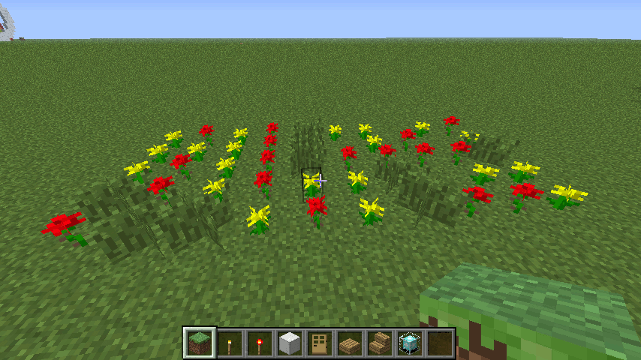
None of the tree methods require parameters. Tree methods will only be successful if the tree is placed on grass in a setting where trees can grow. Drone.garden() method
places random flowers and long grass (similar to the effect of placing bonemeal on grass)
Parameters
- width - the width of the garden
- length - how far from the drone the garden extends
Example
To create a garden 10 blocks wide by 5 blocks long...
garden(10,5);
Drone.rand() method
rand takes either an array (if each blockid has the same chance of occurring) or an object where each property is a blockid and the value is it's weight (an integer)
Example
place random blocks stone, mossy stone and cracked stone (each block has the same chance of being picked)
rand( [blocks.brick.stone, blocks.brick.mossy, blocks.brick.cracked ],w,d,h)
to place random blocks stone has a 50% chance of being picked,
rand({blocks.brick.stone: 5, blocks.brick.mossy: 3, blocks.brick.cracked: 2},w,d,h)
regular stone has a 50% chance, mossy stone has a 30% chance and cracked stone has just a 20% chance of being picked.
Copy & Paste using Drone
A drone can be used to copy and paste areas of the game world.
Drone.copy() method
Copies an area so it can be pasted elsewhere. The name can be used for pasting the copied area elsewhere...
Parameters
- name - the name to be given to the copied area (used by
paste) - width - the width of the area to copy
- height - the height of the area to copy
- length - the length of the area (extending away from the drone) to copy
Example
drone.copy('somethingCool',10,5,10).right(12).paste('somethingCool');
Drone.paste() method
Pastes a copied area to the current location.
Example
To copy a 10x5x10 area (using the drone's coordinates as the starting point) into memory. the copied area can be referenced using the name 'somethingCool'. The drone moves 12 blocks right then pastes the copy.
drone.copy('somethingCool',10,5,10)
     .right(12)
     .paste('somethingCool');
Chaining
All of the Drone methods return a Drone object, which means methods can be 'chained' together so instead of writing this...
drone = new Drone();
drone.fwd(3);
drone.left(2);
drone.box(2); // create a grass block
drone.up();
drone.box(2); // create another grass block
drone.down();
...you could simply write ...
var drone = new Drone().fwd(3).left(2).box(2).up().box(2).down();
... since each Drone method is also a global function that constructs a drone if none is supplied, you can shorten even further to just...
fwd(3).left(2).box(2).up().box(2).down()
The Drone object uses a Fluent Interface to make ScriptCraft scripts more concise and easier to write and read. Minecraft's in-game command prompt is limited to about 80 characters so chaining drone commands together means more can be done before hitting the command prompt limit. For complex building you should save your commands in a new script file and load it using /js load()
Drone Properties
- x - The Drone's position along the west-east axis (x increases as you move east)
- y - The Drone's position along the vertical axis (y increses as you move up)
- z - The Drone's position along the north-south axis (z increases as you move south)
- dir - The Drone's direction 0 is east, 1 is south , 2 is west and 3 is north.
Extending Drone
The Drone object can be easily extended - new buidling recipes/blue-prints can be added and can
become part of a Drone's chain using the static method Drone.extend.
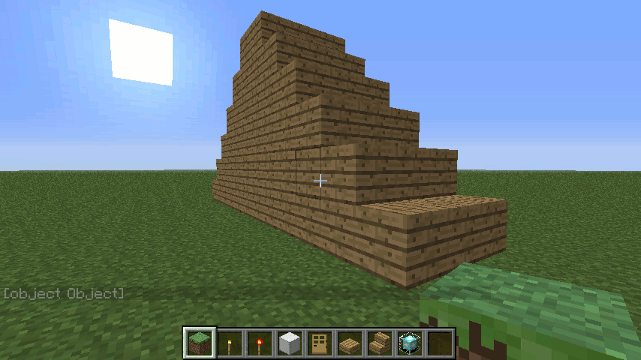
Drone.extend() static method
Use this method to add new methods (which also become chainable global functions) to the Drone object.
Parameters
- name - The name of the new method e.g. 'pyramid'
- function - The method body.
Example
// submitted by [edonaldson][edonaldson]
Drone.extend('pyramid', function(block,height){
    this.chkpt('pyramid');
    for (var i = height; i > 0; i -= 2) {
        this.box(block, i, 1, i).up().right().fwd();
    }
    return this.move('pyramid');
});
Once the method is defined (it can be defined in a new pyramid.js file) it can be used like so...
var d = new Drone();
d.pyramid(blocks.brick.stone, 12);
... or simply ...
pyramid(blocks.brick.stone, 12);
Drone Constants
Drone.PLAYER_STAIRS_FACING
An array which can be used when constructing stairs facing in the Drone's direction...
var d = new Drone();
d.box(blocks.stairs.oak + ':' + Drone.PLAYER_STAIRS_FACING[d.dir]);
... will construct a single oak stair block facing the drone.
Drone.PLAYER_SIGN_FACING
An array which can be used when placing signs so they face in a given direction. This is used internally by the Drone.sign() method. It should also be used for placing any of the following blocks...
- chest
- ladder
- furnace
- dispenser
To place a chest facing the Drone ...
drone.box( blocks.chest + ':' + Drone.PLAYER_SIGN_FACING[drone.dir]);
Drone.PLAYER_TORCH_FACING
Used when placing torches so that they face towards the drone.
drone.box( blocks.torch + ':' + Drone.PLAYER_TORCH_FACING[drone.dir]);
Drone.times() Method
The times() method makes building multiple copies of buildings easy. It's possible to create rows or grids of buildings without resorting to for or while loops.
Parameters
- numTimes (optional - default 2) : The number of times you want to repeat the preceding statements.
Example
Say you want to do the same thing over and over. You have a couple of options...
-
You can use a for loop...
d = new Drone(); for (var i =0;i < 4; i++){ d.cottage().right(8); }
While this will fit on the in-game prompt, it's awkward. You need to
declare a new Drone object first, then write a for loop to create the
4 cottages. It's also error prone, even the for loop is too much
syntax for what should really be simple.
-
You can use a while loop...
d = new Drone(); var i=4; while (i--){ d.cottage().right(8); }
... which is slightly shorter but still too much syntax. Each of the
above statements is fine for creating a 1-dimensional array of
structures. But what if you want to create a 2-dimensional or
3-dimensional array of structures? Enter the times() method.
The times() method lets you repeat commands in a chain any number of
times. So to create 4 cottages in a row you would use the following
statement...
cottage().right(8).times(4);
...which will build a cottage, then move right 8 blocks, then do it
again 4 times over so that at the end you will have 4 cottages in a
row. What's more the times() method can be called more than once in
a chain. So if you wanted to create a grid of 20 houses ( 4 x 5 ),
you would do so using the following statement...
cottage().right(8).times(4).fwd(8).left(32).times(5);
... breaking it down...
-
The first 3 calls in the chain (
cottage(),right(8),times(4)) build a single row of 4 cottages. -
The last 3 calls in the chain (
fwd(8),left(32),times(5)) move the drone forward 8 then left 32 blocks (4 x 8) to return to the original x coordinate, then everything in the chain is repeated again 5 times so that in the end, we have a grid of 20 cottages, 4 x 5. Normally this would require a nested loop but thetimes()method does away with the need for loops when repeating builds.
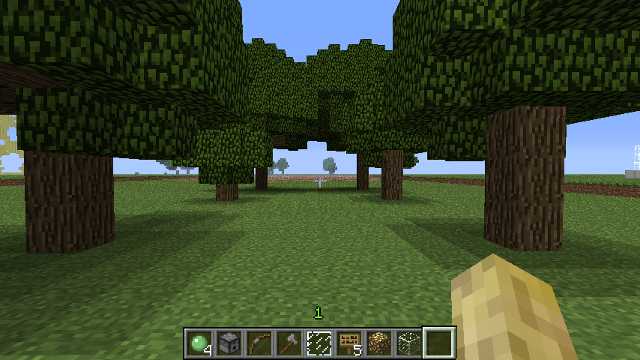
Another example: This statement creates a row of trees 2 by 3 ...
oak().right(10).times(2).left(20).fwd(10).times(3)
... You can see the results below.
Drone.sphere() method
Creates a sphere.
Parameters
- block - The block the sphere will be made of.
- radius - The radius of the sphere.
Example
To create a sphere of Iron with a radius of 10 blocks...
sphere( blocks.iron, 10);
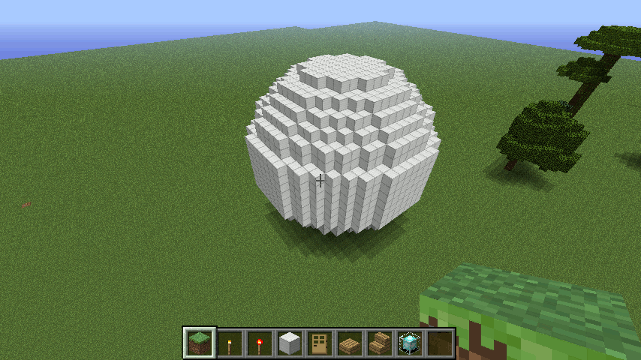
Spheres are time-consuming to make. You can make large spheres (250 radius) but expect the server to be very busy for a couple of minutes while doing so.
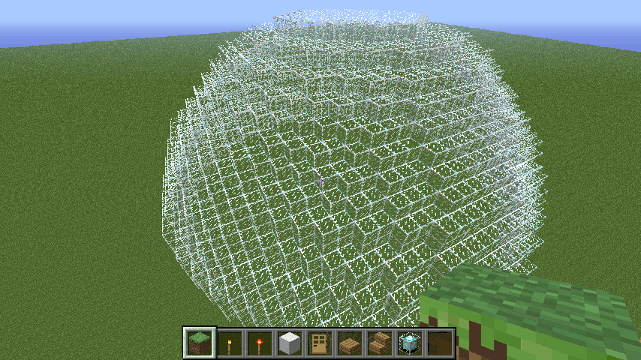
Drone.sphere0() method
Creates an empty sphere.
Parameters
- block - The block the sphere will be made of.
- radius - The radius of the sphere.
Example
To create a sphere of Iron with a radius of 10 blocks...
sphere0( blocks.iron, 10);
Spheres are time-consuming to make. You can make large spheres (250 radius) but expect the server to be very busy for a couple of minutes while doing so.
Drone.hemisphere() method
Creates a hemisphere. Hemispheres can be either north or south.
Parameters
- block - the block the hemisphere will be made of.
- radius - the radius of the hemisphere
- northSouth - whether the hemisphere is 'north' or 'south'
Example
To create a wood 'north' hemisphere with a radius of 7 blocks...
hemisphere(blocks.oak, 7, 'north');
Drone.hemisphere0() method
Creates a hollow hemisphere. Hemispheres can be either north or south.
Parameters
- block - the block the hemisphere will be made of.
- radius - the radius of the hemisphere
- northSouth - whether the hemisphere is 'north' or 'south'
Example
To create a glass 'north' hemisphere with a radius of 20 blocks...
hemisphere0(blocks.glass, 20, 'north');
Blocks Module
You hate having to lookup Data Values when you use ScriptCraft's Drone() functions. So do I. So I created this blocks object which is a helper object for use in construction.
Examples
box( blocks.oak ); // creates a single oak wood block
box( blocks.sand, 3, 2, 1 ); // creates a block of sand 3 wide x 2 high x 1 long
box( blocks.wool.green, 2 ); // creates a block of green wool 2 blocks wide
In addition, each of the wool colors is also available as a block property so you can use either
blocks.wool.green or the more concise blocks.green. There's also a convenience array blocks.rainbow which is an array of the 7 colors of the rainbow (or closest approximations).
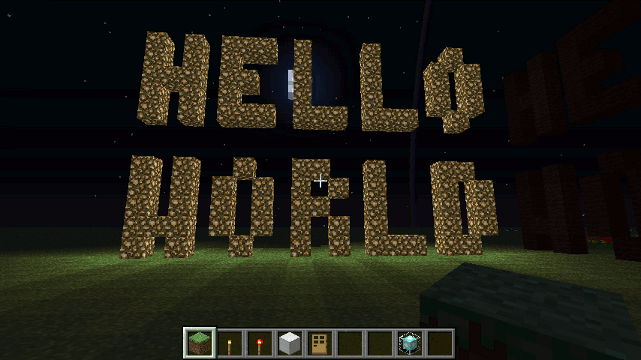
Drone.blocktype() method
Creates the text out of blocks. Useful for large-scale in-game signs.
Parameters
- message - The message to create - (use
\nfor newlines) - foregroundBlock (default: black wool) - The block to use for the foreground
- backgroundBlock (default: none) - The block to use for the background
Example
To create a 2-line high message using glowstone...
blocktype("Hello\nWorld",blocks.glowstone);
events Module
The Events module provides a thin wrapper around Bukkit's Event-handling API. Bukkit's Events API makes use of Java Annotations which are not available in Javascript, so this module provides a simple way to listen to minecraft events in javascript.
events.on() static method
This method is used to register event listeners.
Parameters
-
eventName - A string or java class. If a string is supplied it must be part of the Bukkit event class name. See Bukkit API for details of the many bukkit event types. When a string is supplied there is no need to provide the full class name - you should omit the 'org.bukkit.event' prefix. e.g. if the string "block.BlockBreakEvent" is supplied then it's converted to the org.bukkit.event.block.BlockBreakEvent class .
If a java class is provided (say in the case where you've defined your own custom event) then provide the full class name (without enclosing quotes).
-
callback - A function which will be called whenever the event fires. The callback should take 2 parameters, listener (the Bukkit registered listener for this callback) and event (the event fired).
-
priority (optional - default: "HIGHEST") - The priority the listener/callback takes over other listeners to the same event. Possible values are "HIGH", "HIGHEST", "LOW", "LOWEST", "NORMAL", "MONITOR". For an explanation of what the different priorities mean refer to bukkit's Event API Reference.
Returns
An org.bukkit.plugin.RegisteredListener object which can be used to unregister the listener. This same object is passed to the callback function each time the event is fired.
Example:
The following code will print a message on screen every time a block is broken in the game
events.on("block.BlockBreakEvent", function(listener, evt){
    echo (evt.player.name + " broke a block!");
});
To handle an event only once and unregister from further events...
events.on("block.BlockBreakEvent", function(listener, evt){
    print (evt.player.name + " broke a block!");
    evt.handlers.unregister(listener);
});
To unregister a listener outside of the listener function...
var myBlockBreakListener = events.on("block.BlockBreakEvent",function(l,e){ ... });
...
var handlers = org.bukkit.event.block.BlockBreakEvent.getHandlerList();
handlers.unregister(myBlockBreakListener);
http.request() function
The http.request() function will fetch a web address asynchronously (on a separate thread)and pass the URL's response to a callback function which will be executed synchronously (on the main thread). In this way, http.request() can be used to fetch web content without blocking the main thread of execution.
Parameters
-
request: The request details either a plain URL e.g. "http://scriptcraft.js/sample.json" or an object with the following properties...
- url: The URL of the request.
- method: Should be one of the standard HTTP methods, GET, POST, PUT, DELETE (defaults to GET).
- params: A Javascript object with name-value pairs. This is for supplying parameters to the server.
-
callback: The function to be called when the Web request has completed. This function takes the following parameters...
- responseCode: The numeric response code from the server. If the server did not respond with 200 OK then the response parameter will be undefined.
- response: A string (if the response is of type text) or object containing the HTTP response body.
Example
The following example illustrates how to use http.request to make a request to a JSON web service and evaluate its response...
var jsResponse;
http.request("http://scriptcraftjs.org/sample.json",function(responseCode, responseBody){
    jsResponse = eval("(" + responseBody +  ")");
});
... The following example illustrates a more complex use-case POSTing parameters to a CGI process on a server...
http.request({ url: "http://pixenate.com/pixenate/pxn8.pl",
               method: "POST",
               params: {script: "[]"}
             }, function( responseCode, responseBody){
      var jsObj = eval("(" + responseBody + ")");
  });
Utilities Module
Miscellaneous utility functions and classes to help with programming.
-
locationToString(Location) - returns a bukkit Location object in string form.
-
getPlayerObject(playerName) - returns the Player object for a named player or
selfif no name is provided.
utils.foreach() function
The utils.foreach() function is a utility function for iterating over an array of objects (or a java.util.Collection of objects) and processing each object in turn. Where utils.foreach() differs from other similar functions found in javascript libraries, is that utils.foreach can process the array immediately or can process it nicely by processing one item at a time then delaying processing of the next item for a given number of server ticks (there are 20 ticks per second on the minecraft main thread). This method relies on Bukkit's org.bukkit.scheduler package for scheduling processing of arrays.
Parameters
-
array : The array to be processed - It can be a javascript array, a java array or java.util.Collection
-
callback : The function to be called to process each item in the array. The callback function should have the following signature
callback(item, index, object, array). That is the callback will be called with the following parameters....- item : The item in the array
- index : The index at which the item can be found in the array.
- object : Additional (optional) information passed into the foreach method.
- array : The entire array.
-
object (optional) : An object which may be used by the callback.
-
delay (optional, numeric) : If a delay is specified (in ticks - 20 ticks = 1 second), then the processing will be scheduled so that each item will be processed in turn with a delay between the completion of each item and the start of the next. This is recommended for big builds (say 200 x 200 x 200 blocks) or any CPU-intensive process.
-
onDone (optional, function) : A function to be executed when all processing is complete. This parameter is only used when the processing is delayed. (It's optional even if a delay parameter is supplied).
If called with a delay parameter then foreach() will return
immediately after processing just the first item in the array (all
subsequent items are processed later). If your code relies on the
completion of the array processing, then provide an onDone parameter
and put the code there.
Example
The following example illustrates how to use foreach for immediate processing of an array...
var players = ["moe", "larry", "curly"];
foreach (players, function(item){
    server.getPlayer(item).sendMessage("Hi " + item);
});
The following example is a more complex use case - The need to build an enormous structure without hogging CPU usage...
// build a structure 200 wide x 200 tall x 200 long
// (That's 8 Million Blocks - enough to tax any machine!)

var a = [];
a.length = 200;
var drone = new Drone();
var processItem = function(item, index, object, array){
    // build a box 200 wide by 200 long then move up
    drone.box(blocks.wood, 200, 1, 200).up();
};
// by the time the job's done 'self' might be someone else
// assume this code is within a function/closure
var player = self;
var onDone = function(){
    player.sendMessage("Job Done!");
};
foreach (a, processItem, null, 10, onDone);
utils.nicely() function
The utils.nicely() function is for performing processing using the
org.bukkit.scheduler package/API. utils.nicely() lets you
process with a specified delay between the completion of each next()
function and the start of the next next() function.
utils.nicely() is a recursive function - that is - it calls itself
(schedules itself actually) repeatedly until hasNext returns false.
Parameters
- next : A function which will be called if processing is to be done.
- hasNext : A function which is called to determine if the
nextcallback should be invoked. This should return a boolean value - true if thenextfunction should be called (processing is not complete), false otherwise. - onDone : A function which is to be called when all processing is complete (hasNext returned false).
- delay : The delay (in server ticks - 20 per second) between each call.
Example
See the source code to utils.foreach for an example of how utils.nicely is used.
String class extensions
The following chat-formatting methods are added to the javascript String class..
- black()
- darkblue()
- blue()
- darkgreen()
- darkaqua()
- darkred()
- purple()
- gold()
- gray()
- darkgray()
- indigo()
- brightgreen()
- green()
- aqua()
- red()
- pink()
- yellow()
- white()
- bold()
- random()
- strike()
- underline()
- italic()
- reset()
Example
var boldGoldText = "Hello World".bold().gold();
self.sendMessage(boldGoldText);
Hello World